Following Microsoft Build last week and the release of Botkit 4.0, I thought it would be a nice idea to take a look and see what’s new.
“Why would Microsoft Build matter when I’m building a bot for Webex Teams” I hear you ask! Well, since the announcement in November last year that XOXCO (the people behind Botkit) were going to join Microsoft, they have clearly been very busy rebuilding and rearchitecting Botkit to fit into the wider ecosystem that is the Microsoft Bot Framework and the Bot Framework SDK (previously BotBuilder).
In doing so, this should make it much simpler to integrate into other areas of the Bot Framework, such as the Cognitive Services provided by LUIS.ai and QnA Maker.
In this post, I will create a simple FAQ Bot using Microsoft QnA Maker and Botkit. In addition, it will use a spreadsheet hosted on SharePoint so that the relevant team can maintain the content without any requirement to update the Bot.
Getting Started
What we’ll be using:
- Webex Teams - Make teamwork your best work. I’m assuming you already have an account given you’re here, but if not, sign up – it’s free!
- Botkit - An open source set of building blocks for building bots. We’ll walk through getting set up with this.
- Microsoft QnA Maker - From FAQ to Bot in minutes. Build, train and publish a simple question and answer bot based on FAQ URLs, structured documents, product manuals or editorial content in minutes. This will require you to set up an account if you don’t already have one. You will also need an Azure account to set up the service. You can use the free tier for this post.
- ngrok - Public URLs for testing your chatbot. Download the latest version.
- node.js - JavaScript runtime. Download and install the latest LTS version if you don’t already have it.
We’ll start by creating the FAQ and connecting that to our Excel spreadsheet on SharePoint. Then we’ll create our Bot and hook the two together. Simple right!
You can find the code for this article at https://github.com/darrenparkinson/faqbot
Creating the FAQ
Before we get started, you’re going to need an account on QnA Maker and you’ll need to set up the service in Azure. This is mostly handled for you when you’re creating the FAQ. I already had an Azure account, so I’m afraid I don’t have detailed instructions, but it should be fairly straight forward.
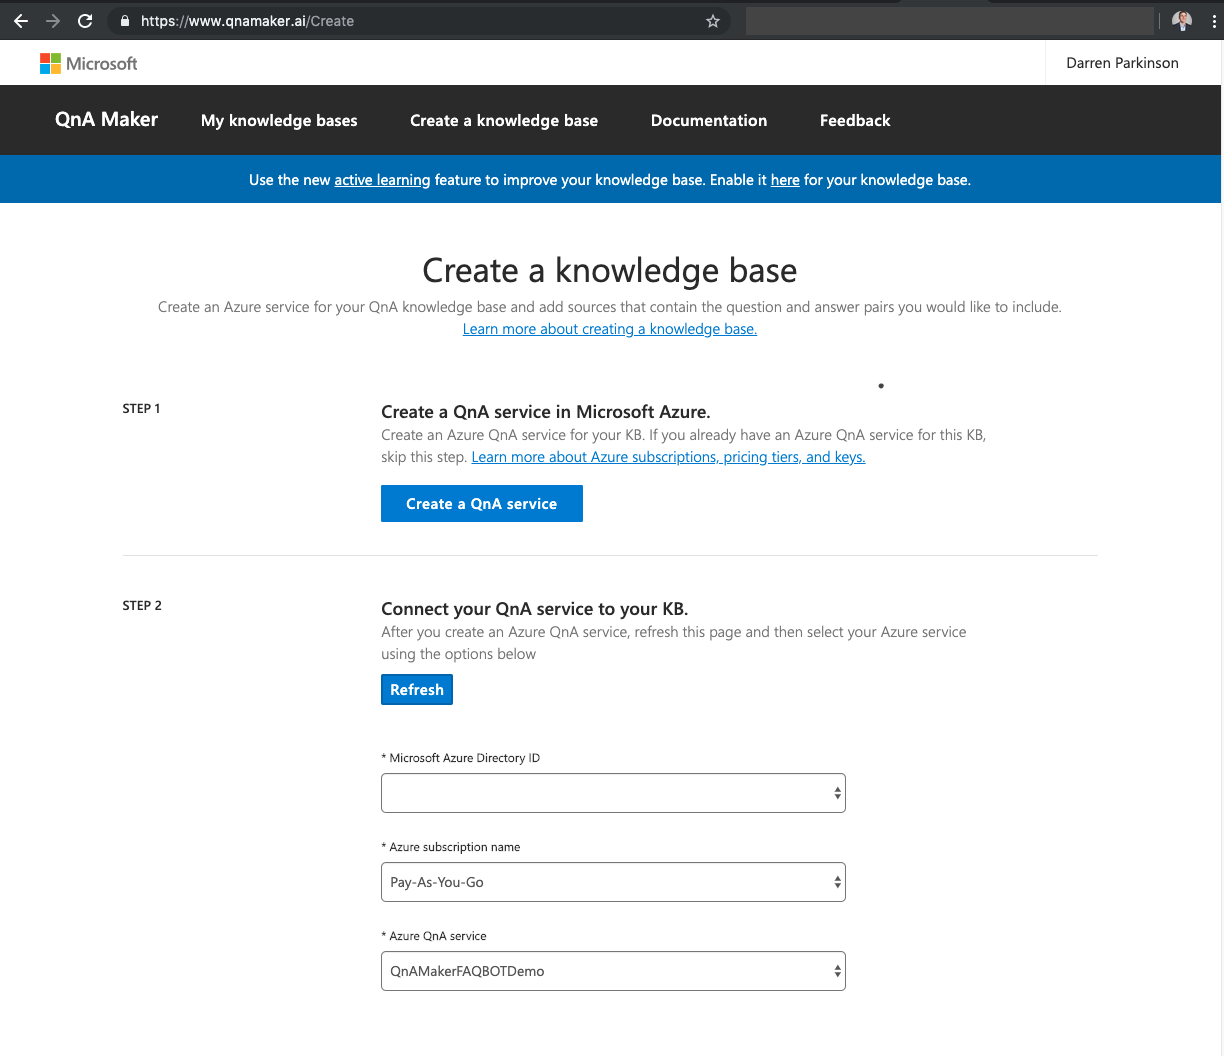
To get started, sign up or log in to qnamaker.ai, click “Create a Knowledgebase” and fill in the details. You will need to have created a Cognitive Services resource along with an App Services plan in the Azure Portal. The QnA Maker page will direct you to the right place to create it using the “Create a QnA Service” button. Follow the instructions, ensuring you only select the “Free Tier” option. This will be enough for testing. Once you’re back, you should click the blue “Refresh” button and then select the newly created service.
We then need to add content to our knowledge base. QnA Maker supports various formats, including .pdf, .doc, .docx, .xlsx, .tsv and FAQ URLs. The content is essentially question and answer pairs which QnA Maker will attempt to extract from the provided documents. They have some guidelines about what your content should look like. In our case, we’ll just use a simple Excel spreadsheet. You might already have a faq page or document you can apply.
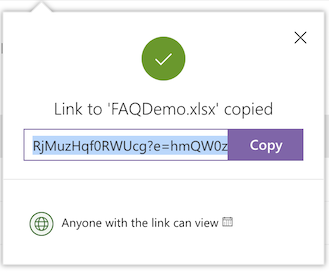
You can add files directly or use a file that has a public URL. In our case, since we use SharePoint, we are also able to use that. This is clearly the best option since connecting to SharePoint is the only option that allows authenticated content. In addition, it means that I can get someone else to manage that content 😉. In this instance, it must be a file – we can’t just use a FAQ Page from SharePoint. To get it to connect, I had to make it a publicly shareable link which doesn’t seem quite right given I had to authenticate, but I got errors in all other scenarios I tested.
I downloaded the sample FAQ from the Azure Samples site to get an idea of the content structure, and basically it’s two columns: Question and Answer.

Since I don’t have many rows in my FAQ yet, I also added one of the “Chit-chat” options to give it some added personality.
Click “Create your KB”. Because I specified a SharePoint URL, I was prompted for Permissons. You should then see all your questions in the Knowledge Base, which you can edit as required.
Finally, you just need to “Publish” your QnAMaker Knowledge Base – on doing so, it will provide you with instructions on how to ask questions from your Knowledge Base, for Postman:
POST /knowledgebases/111222333-4444-aaaa-bbbb-cccccccc/generateAnswer
Host: https://qnamakerfaqbotdemo.azurewebsites.net/qnamaker
Authorization: EndpointKey <removed>
Content-Type: application/json
{"question":"<Your question>"}
Or Curl:
curl -X POST https://qnamakerfaqbotdemo.azurewebsites.net/qnamaker/knowledgebases/111222333-4444-aaaa-bbbb-cccccccc/generateAnswer -H "Authorization: EndpointKey <removed>" -H "Content-type: application/json" -d "{'question':'<Your question>'}"
You can use either of these to test your knowledge base:
curl -X POST https://qnamakerfaqbotdemo.azurewebsites.net/qnamaker/knowledgebases/111222333-4444-aaaa-bbbb-cccccccc/generateAnswer -H "Authorization: EndpointKey <removed>" -H "Content-type: application/json" -d "{'question':'Where do I go for answers?'}"
Response:
{"answers":[{"questions":["Where do I go to get answers about anything else."],"answer":"You could try google. Failing that, speak to a colleague.","score":41.81,"id":1,"source":"https://natilik.sharepoint.com/:x:/t/it/<removed>","metadata":[{"name":"key1","value":"value1"}],"context":{"isContextOnly":false,"prompts":[]}}],"debugInfo":null}
Now that we have the FAQ all set up, we’re ready to create our Bot.
Building the Bot
Obtaining an Access Token
Before we build the Bot, we’ll need an access token from Webex Teams:
- Go to developer.webex.com/my-apps
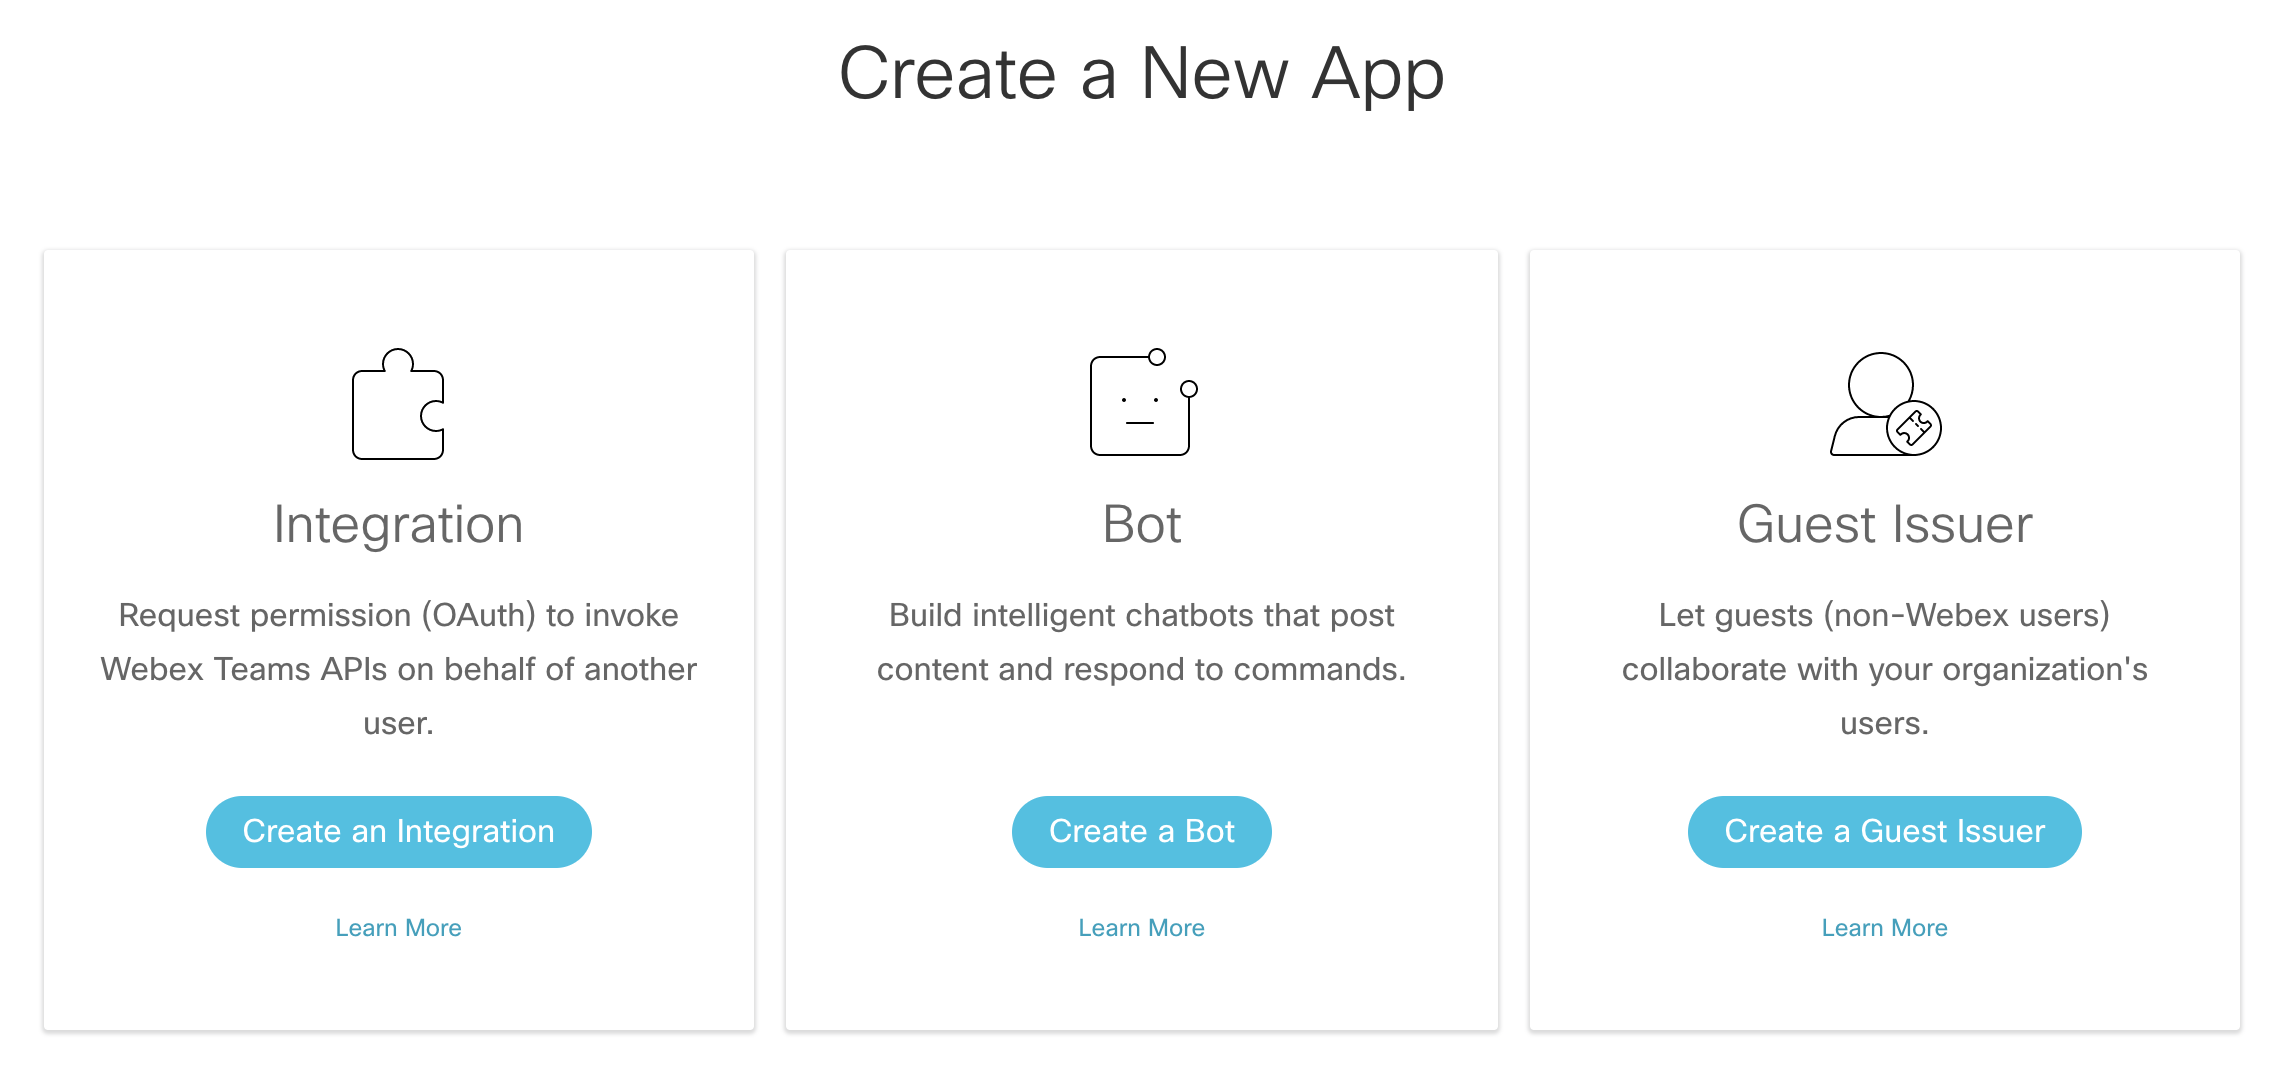
- Select “Create a New App”
- Click “Create a Bot”
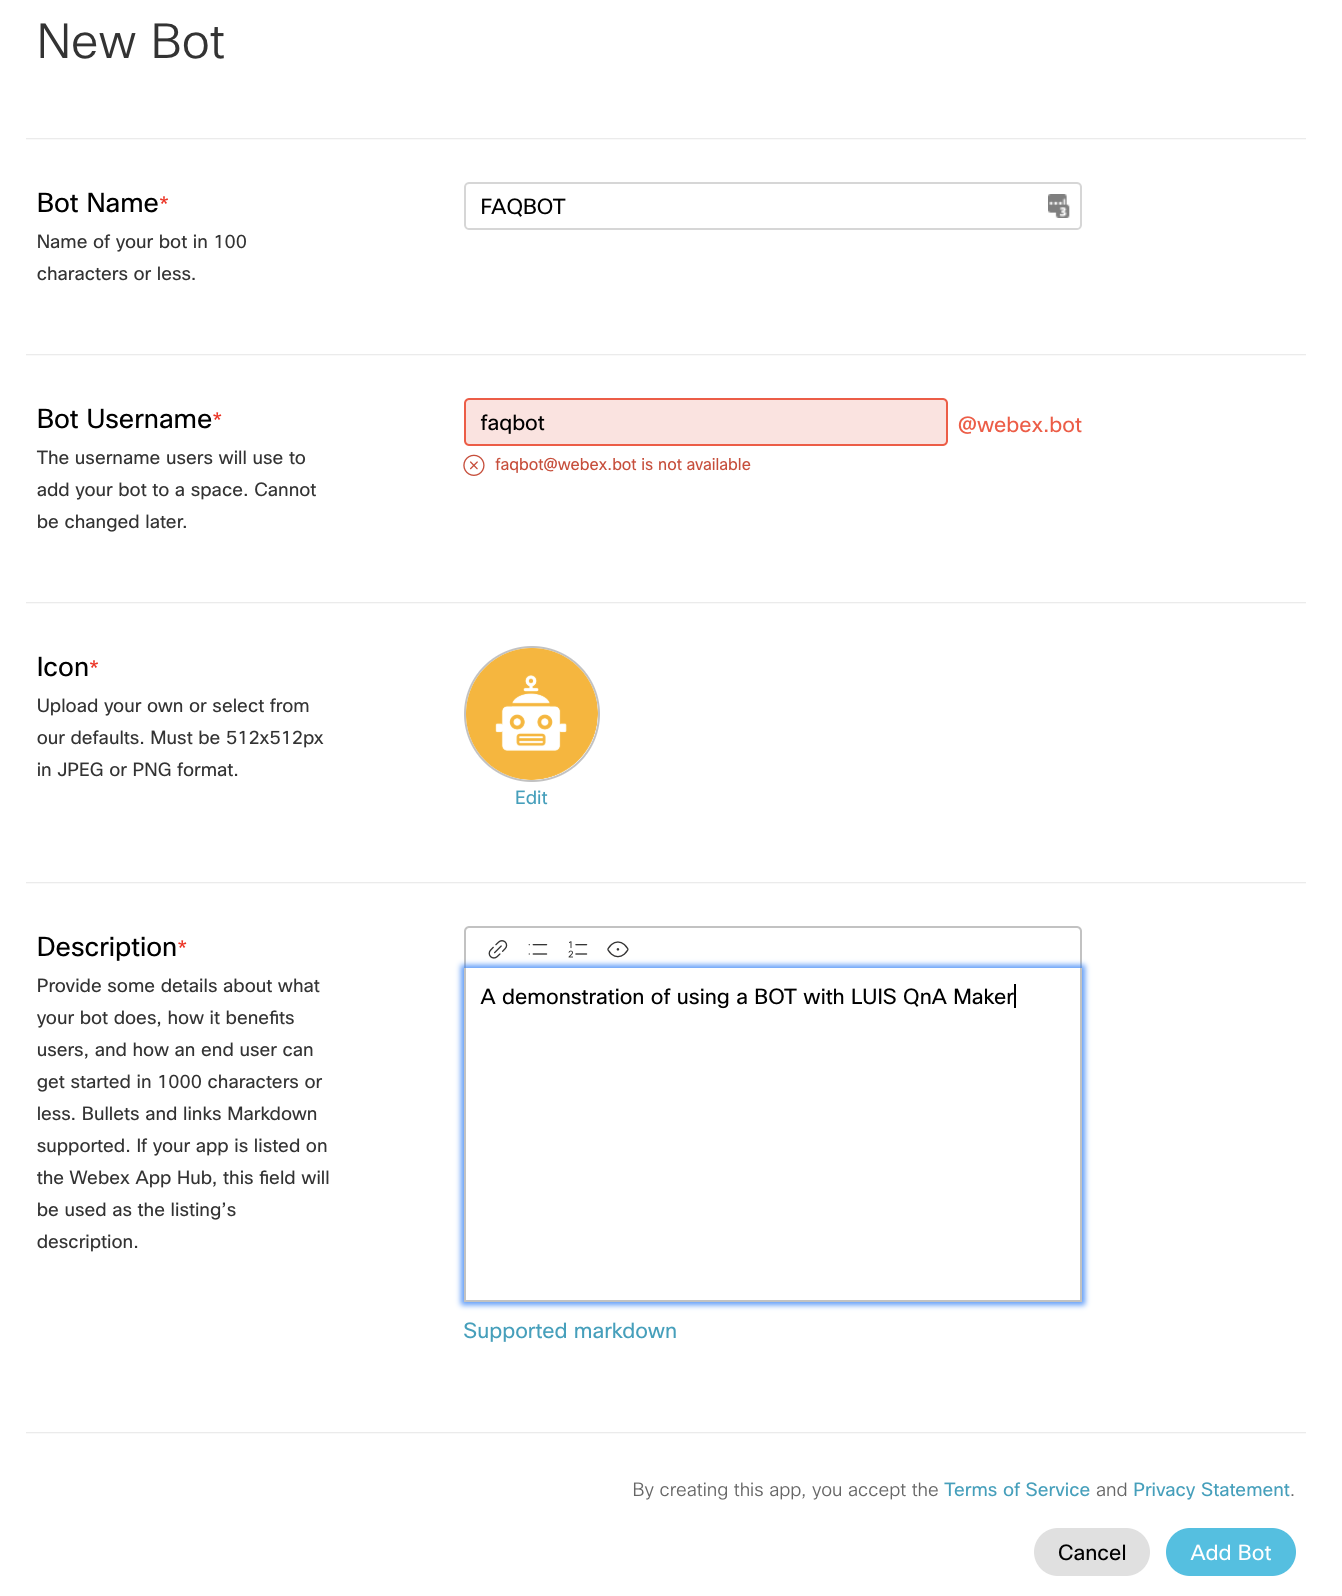
- Give your Bot a name, a username, choose an icon and give it a description. In our case, we used:
- Name: FAQBOT
- Username: faqbotdemo@webex.bot (faqbot was already taken ☹️ – it will let you know if what you’re entering isn’t available)
- Icon: Default 1
- Description: A demonstration of using a BOT with LUIS QnA Maker
When you click Add Bot it will present you with your Access Token. Make sure you copy this somewhere else straight away as you will need it later and it will be permanently hidden once you leave this page.
Running ngrok
When developing a Bot, Webex Teams needs a way to send the messages to your Bot. Typically this is via a public URL. During development, it’s useful to be able to use your locahost address so you don’t need to immediatly host your Bot somewhere on the internet.
This is where ngrok comes in – it allows you to expose a public URL which points to your development machine via a tunnel. To do that, simply run ngrok http 3000 in another terminal and make a note of the resulting https address. This will redirect any traffic to that https address to your local machine on port 3000 (which is what the Bot will use).
ngrok http 3000
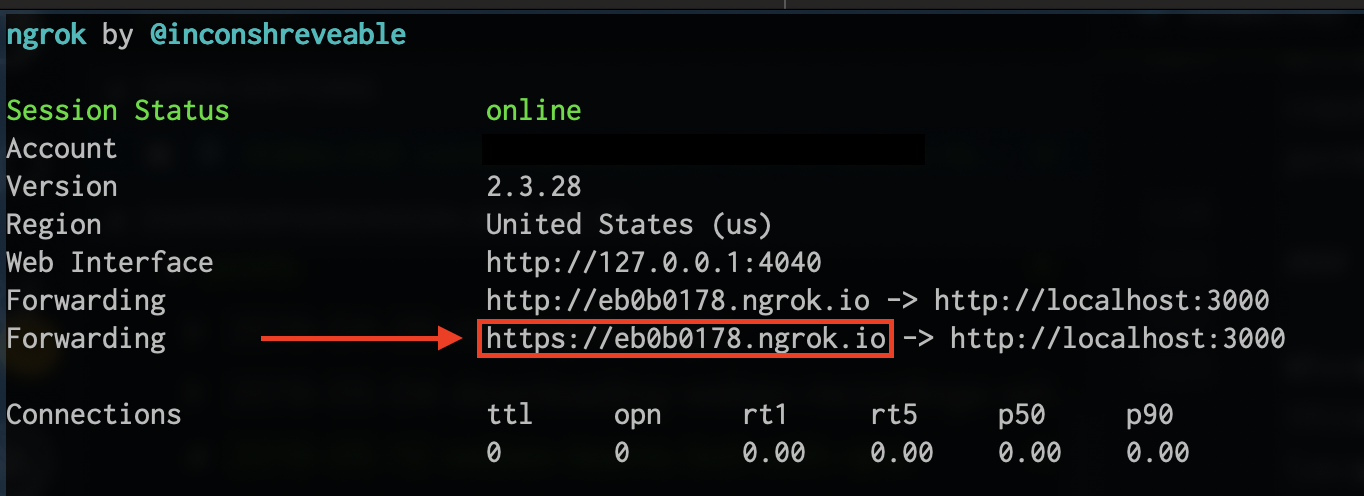
Bear in mind that this address will change every time you run ngrok (unless you have a paid account).
Generating the Bot
Botkit is the component that links Webex Teams with our FAQ. It will accept the messages that users type in and respond with the results from the FAQ.
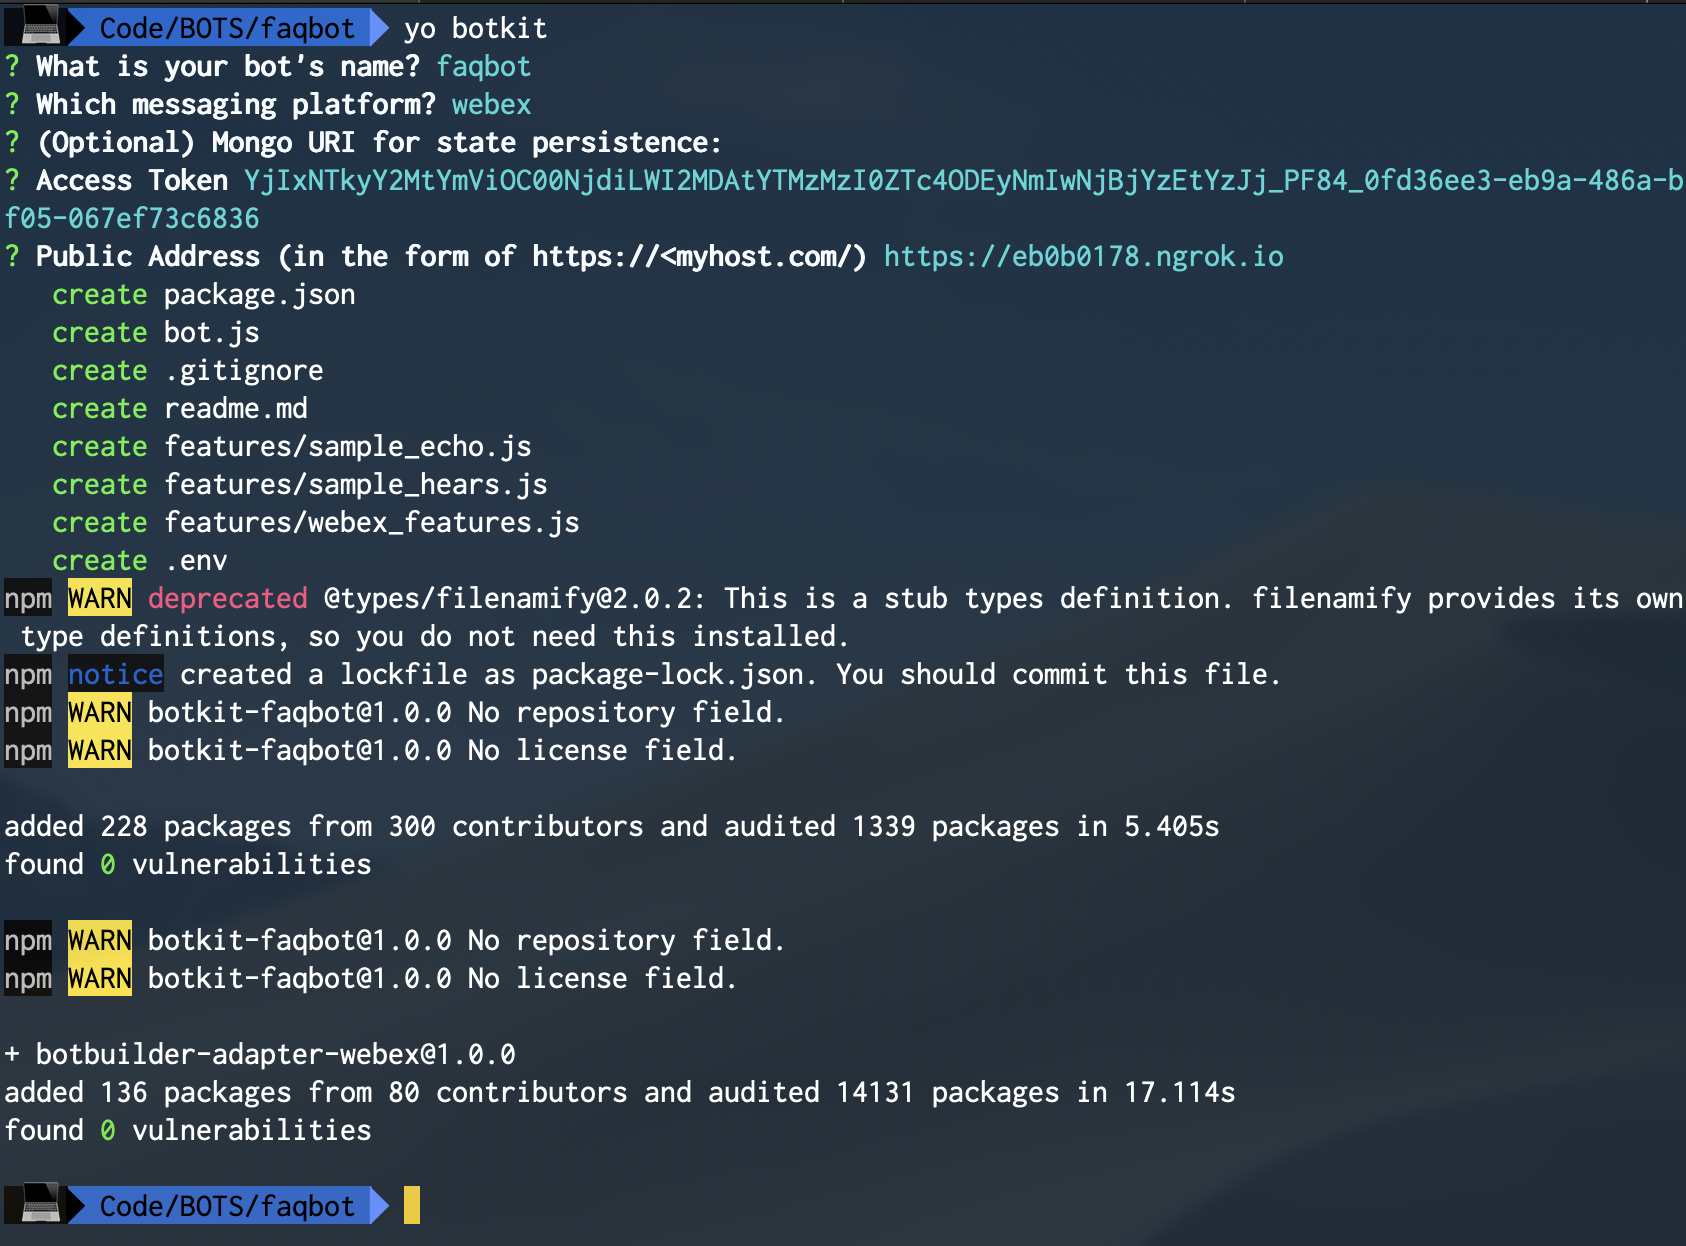
With previous versions, there were various “starter kits” you could use to get going. With this new version, they have adopted Yeoman Generators to help us get up and running (very Microsoft!). This essentially enables them to ask us some questions and build a template based on the answers:
$ npm install -g yo generator-botkit
$ mkdir faqbot
$ cd faqbot
$ yo botkit
At this point you’ll be prompted to answer some questions. This is where you’ll need your access token and your ngrok address. Answer “webex” when prompted for the platform you’ll be using.
I think over time this will be extended to simplify the addition of things like QnA Maker and LUIS automatically.
Interacting with the Bot
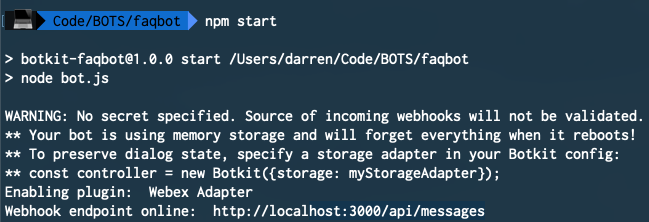
Once we’ve generated the Bot, the template will already have some “features” that we can test out to make sure it’s working. Run the bot using npm start:
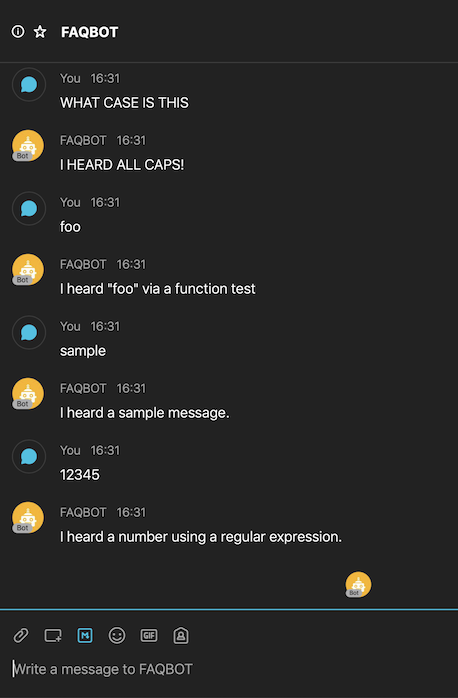
Then go to Webex Teams and create a space with the new bot. Type something and you should see it echoed back to you. You can see the code for these features under the features folder. There are a few other examples you can try too.
Before we continue, let’s just fix that WARNING. It’s complaining that we haven’t specified a “secret”, which is used to generate a signature that can be used to verify messages your bot receives. Looking at the Webex Adapter Options we just need to add the “secret” field to our config. You can do that by editing the .env file. This is also where you can update the public_address and access_token fields we specified earlier on. For the secret, just add SECRET="somerandomstringofcharacters". In addition, we also have to add it to our options in bot.js.
Change this:
const adapter = new WebexAdapter({
    access_token: process.env.access_token,
    public_address: process.env.public_address
})
To this:
const adapter = new WebexAdapter({
    access_token: process.env.access_token,
    public_address: process.env.public_address,
    secret: process.env.SECRET
})
Once we’ve done this, we can reload the BOT. That WARNING should now have disappeared.
To avoid having to run npm start every time we make a change, we can use nodemon instead, which you can install using npm install -g nodemon. This will reload your Bot every time you make a change to the code. Once installed, simply run nodemon which will call npm start for you and reload every time you make changes.
Adding the FAQ to the BOT
With the previous version of botkit I would have created my own middleware to use the QnA knowledgebase, but now botkit is part of the Microsoft Bot Framework, this is a lot easier since we can make use of libraries already created for the purpose.
To start, update your .env file with the following variables:
QnAKnowledgebaseId="<knowledge-base-id>"
QnAAuthKey="<your-endpoint-key>"
QnAEndpointHostName="<your-hostname>"
You can get these from the Settings of your QnA Knowledge Base under Deployment Details:
POST /knowledgebases/<Your_Knowledge_Base_Id>/getAnswersAuthorization: EndpointKey <Your_Endpoint_Key>Host: <Your_Hostname>/qnamaker
The full URL string for your Hostname will look like “https://< >.azure.net/qnamaker”.
Install the botbuilder.ai library:
npm install --save botbuilder-ai

Add the following code to bot.js straight after the controller is initialised:
const qnaMaker = new QnAMaker({
    knowledgeBaseId: process.env.QnAKnowledgebaseId,
    endpointKey: process.env.QnAAuthKey,
    host: process.env.QnAEndpointHostName
});

controller.middleware.ingest.use(async (bot, message, next) => {
    if (message.incoming_message.type === 'message') {
        const qnaResults = await qnaMaker.getAnswers(message.context);
        if (qnaResults[0]) {
            // If we got an answer, send it directly
            await message.context.sendActivity(qnaResults[0].answer);
            // await bot.reply(message, qnaResults[0].answer); // also works
        } else {
            // If we have no other features, we could just say we didn't find any answers:
            //await message.context.sendActivity('No QnA Maker answers were found.');
            // Otherwise, just forward to the next BotHandler to see if there are any other matches
            next();
        }
    } else {
        next();
    }
});
And add the following at the top of bot.js with the other imports:
const { QnAMaker } = require('botbuilder-ai');
This is essentially creating some middleware that will check every message that is received by the bot with the QnA Maker service to see if there is a valid response. If there is, it will send the response, otherwise it will call next() to pass it onwards along the chain to see if there are any other features that match the message.
In this case, we’re using the ingest middleware function which occurs immediately after the message has been received, before any other processing. You can see the other middleware options in the botkit docs which basically occur at different stages of a messages flow.
Testing the Bot
In our space with the Bot, we can now try asking questions from our spreadsheet and the personality we added to see if we get appropriate responses.

Now I just need to check that the FAQ is getting updated when new entries are added.
Where Next?
Now that we have a basic bot up and running, we can maybe start looking at adding more commands or faqs and using the new “Dispatch Tool”.
Dispatch is a tool to create and evaluate LUIS models used to dispatch intent across multiple bot modules such as LUIS models, QnA knowledge bases and others.
What this means is that you could have a FAQ per department that each team maintains and Dispatch will decide which faq to route the bot to based on the question asked.
In addition, you can create your own LUIS applications with domain specific commands and conversation flows.
I expect there will be some follow up posts around this, but if you have any questions or feedback, feel free to comment below.