In this post, I’m using an ultrasonic sensor with a Raspberry Pi and the periph Go library.
For some time I’ve been looking into how I might identify that a person has entered my drive. We’ve had a reasonable number of events in our street where things have been taken from cars and I thought it would be an interesting project to try and raise some sort of alarm when it happens. To be clear, we also have cameras which pick up the activity, but only after the event since they have no automation capabilities available.
Obviously there are a thousand different ways you could approach this, ranging from getting better cameras to using lasers. On investigation, I thought that the ultrasonic sensor might be a more discreet and slightly less expensive option to start with.
Equipment Used:
- Raspberry Pi - It is assumed you have a running Raspberry Pi with ssh enabled. In my case, this is an older Raspberry Pi 3 Model B, but should be ok with any
- Ultrasonic Sensor HC-SR04
- Breadboard
- Jumper Wire
- Resistors (for voltage divider) - I used a 560 ohm and a 270 ohm one, but you can use other combinations (see later)
For the code I’ll be using:
- Go - A great open source programming language that makes it easy to build simple, reliable, and efficient software
- periph - A go library for interacting with hardware that supports a number of platforms, including the Pi.
If you want a python version, there is a really good tutorial at The Pi Hut
As a side note, to write and compile the code, rather than doing it directly on the Pi, I’m using Visual Studio Code on my normal desktop and then compiling it to target the Pi. This allows me to write and compile the code on the Mac and then send it to the Pi for execution, avoiding the need for me to install Go on the Pi. Overall it’s a much better experience because I can continue using my normal development environment. If I had Go on the Pi though, I’d still use my normal desktop environment, but add in the excellent “Remote - SSH” extension.
To help with the process I created a basic Makefile which you can see in the repository.
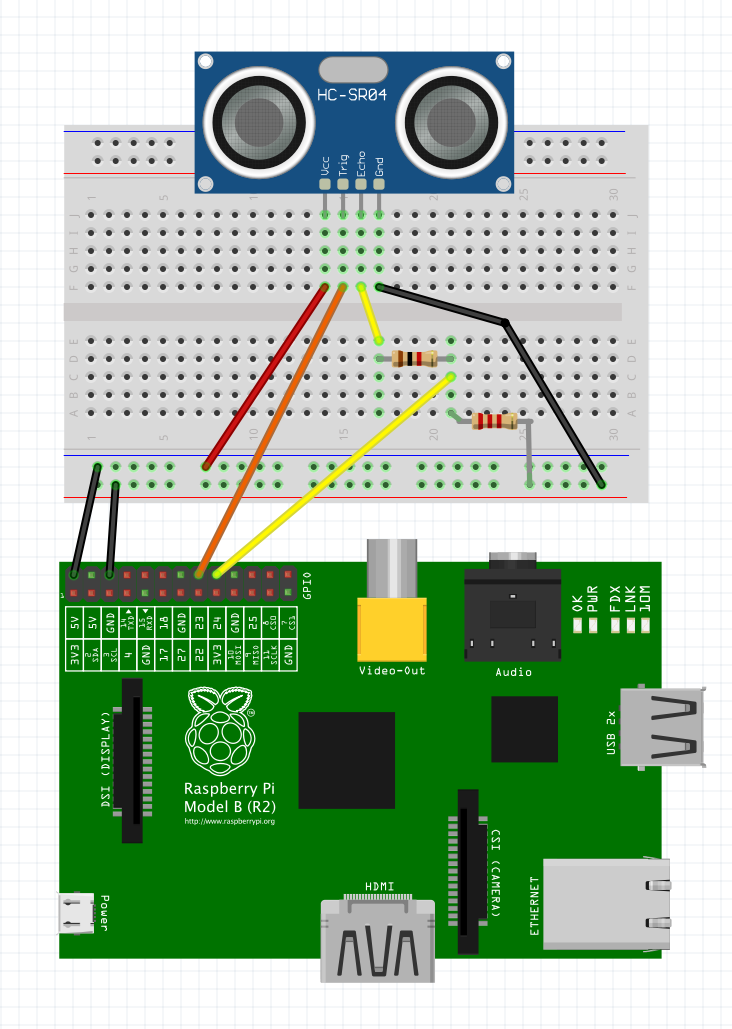
The Circuit
The ultrasonic sensor essentially has four pins:
- Vcc - Voltage In. This is connected to 5V on the Pi
- Gnd - Ground, connected to a Ground pin on the Pi
- Trig - Trigger which is used for initiating detection
- Echo - Which is used for obtaining the readings
One point to note however is that the GPIO pins on the Raspberry Pi are 3.3v and the output of the Echo pin is 5v, so in order to reduce that voltage, I’m using a Voltage Divider with a couple of resistors in the circuit. To work out which ones you can use, you can use the following formula, or use an online calculator.
$$V_{out} = V _{in} \frac{R_2}{R_1+R_2}$$
I used what I had a available which is a 560Ω and a 270Ω resistor. That works out as
$$3.37v = 5v \frac{560}{270+560}$$
Which is near enough! The Pi Hut tutorial does a great job of explaining this further if you need it.
This is essentially the setup I’m using, with the Trigger on GPIO23 and the Echo on GPIO24 (see below):
Peripherals I/O in Go
To access the sensor from the Pi, I’m using the periph library. They have some great ready made tools that you can use and they even provide a utility for you to send them to your Raspberry Pi without having to install Go on it.
So, from my desktop:
$ go get -u periph.io/x/periph/cmd/...
$ go get -u periph.io/x/bootstrap/cmd/push
$ push -host pi.local periph.io/x/periph/cmd/headers-list
Connecting to the pi and running the pushed command provides the expected output:
./headers-list
AUDIO: 2 pins
  Pos  Name    Func
  1    GPIO41  PWM1
  2    GPIO40  PWM0

HDMI: 1 pins
  Pos  Name    Func
  1    GPIO46  In/High

P1: 40 pins
     Func    Name  Pos  Pos  Name    Func
             3.3V    1  2    5V
  In/High   GPIO2    3  4    5V
  In/High   GPIO3    5  6    GROUND
  In/High   GPIO4    7  8    GPIO14  In/Low
           GROUND    9  10   GPIO15  In/High
   In/Low  GPIO17   11  12   GPIO18  In/Low
   In/Low  GPIO27   13  14   GROUND
   In/Low  GPIO22   15  16   GPIO23  In/Low
             3.3V   17  18   GPIO24  In/Low
   In/Low  GPIO10   19  20   GROUND
   In/Low   GPIO9   21  22   GPIO25  In/Low
   In/Low  GPIO11   23  24   GPIO8   In/High
           GROUND   25  26   GPIO7   In/High
  In/High   GPIO0   27  28   GPIO1   In/High
  In/High   GPIO5   29  30   GROUND
  In/High   GPIO6   31  32   GPIO12  In/Low
   In/Low  GPIO13   33  34   GROUND
   In/Low  GPIO19   35  36   GPIO16  In/Low
   In/Low  GPIO26   37  38   GPIO20  In/Low
           GROUND   39  40   GPIO21  In/Low
Great. Looks like it’s all working. Now we’ll use the library to interact with the sensor.
Using the library
Whilst periph doesn’t specifically mention support for the ultrasonic sensor, it does have support for GPIO. This means that I can use the library to directly interact with components connected to the GPIO pins of the Raspberry Pi.
To connect to the pins as outlined above basically involves initialising the library and registering the pins:
host.Init()
trigger := gpioreg.ByName("GPIO23")
echo := gpioreg.ByName("GPIO24")
For the ultrasonic sensor, the way that it works is that you initiate a set of ultrasonic pulses from it by sending it a short pulse to the trigger pin which involves setting it high and then low again 10 microseconds later:
trigger.Out(gpio.High)
time.Sleep(time.Microsecond * 10)
trigger.Out(gpio.Low)
After that, you read the response from the echo pin to measure how long the pin is high and then use the speed of sound to calculate the distance:
var startTime, endTime int64
for echo.Read() == gpio.Low {
    startTime = time.Now().UnixNano()
}
for echo.Read() == gpio.High {
    endTime = time.Now().UnixNano()
}
distance := (float32(endTime-startTime) * 17150) / 1e9
To explain what’s going on here, the speed of sound is essentially around 343m/s at 20 degrees celsius at sea level. The sound wave is hitting an object and then returning, so we can effectively halve the returned distance by using 171.5m/s, and since we’ll be measuring in centimeters, we can multiply that by 100 to give us the 17150 number used in the calculation. Finally we’re dividing the result by a modern billion in order to convert our nanoseconds result into seconds.
From that you can expect that at a different temperature or different altitude, there is going to be some variation in the result, so I’ll need to bear that in mind if I’m sticking this outdoors in the late evening since I’ll most likely be getting slightly different readings.
That’s it for now. Plenty more to do on it before it’s a usable prototype, but it’s a start.